

A typical bathroom renovation takes two to six weeks total. Small projects with professionals move faster, about one to two weeks, while DIY work stretches to three weeks. Your timeline depends on scope. Cosmetic updates take roughly two weeks, but full gut renovations take considerably longer.
Planning takes one to two weeks upfront. Demolition happens in two to four days. Rough-in work (plumbing and electrical) runs three to five days. Installation and finishing touches add one to two weeks.
Keep reading to learn what actually slows projects down.
Quick Answer: How Long Does a Bathroom Renovation Take?

How long a bathroom renovation takes depends on the scope and who handles the work. Small DIY projects run two to three weeks, while professional crews finish in one to two weeks. Larger renovations take considerably longer.
A typical project includes planning, demolition, plumbing, electrical work, and finishing touches. You should budget roughly two to six weeks total. Planning takes one to two weeks upfront. Demolition happens in two to four days. Rough-in work (plumbing and electrical) spans three to five days. Installation runs one to two weeks. Final touches wrap up in two to four days.
Several factors can delay your timeline. Permits, material backordering, and unexpected changes frequently push projects beyond initial estimates. Add a buffer week to your schedule as a safeguard against these common obstacles.
The Five Stages of Bathroom Remodels

A bathroom remodel unfolds through five distinct stages, each with its own timeline and responsibilities. Planning and design comes first, where you’ll visualize your space, select materials, and set your budget before any work begins. Construction follows, tackling demolition, rough-in work, installation, and finishing touches until your bathroom is ready to use.
Planning And Design Phase
Before you swing a sledgehammer, you’ll want to spend 1 to 3 weeks planning and designing your bathroom renovation.
This phase establishes your entire project’s foundation. Start by visualizing your space through 3D renderings or sketches. These tools help you plan layouts before demolition begins. Next, establish a realistic budget with extra funds for surprises. Lock in all material selections early, since backordered items can derail your timeline considerably.
Work with professionals on permits and scheduling during this stage. Aligning your design vision with local requirements prevents costly delays later. Think of planning as your project’s roadmap: it guides every decision ahead. When you nail down these details now, your renovation runs smoothly. You’re investing time upfront to save headaches throughout construction.
Construction Through Completion
Once you’ve locked in your design and permits, the real work begins. I’ll walk you through each stage so you know what to expect.
| Stage | Timeline |
|---|---|
| Demolition | 1–2 days |
| Rough-in Work | 4–8 weeks |
| Installation | 3–10 weeks |
| Finishing Touches | 1–2 weeks |
Demolition happens fast but sets everything in motion. Rough-in work, including plumbing and electrical, takes the longest because inspections and rerouting can cause delays. Installation covers flooring, tiling, and fixtures. Finishing touches include painting and final details.
You’ll encounter common delays: permit wait times, backordered materials, and scheduling gaps between trades. That’s why planning ahead matters. Building in buffer time protects your timeline. From start to finish, you’re looking at 2–10+ weeks depending on complexity.
Planning and Design: The Foundation (1–2 Weeks)

How do you start a bathroom renovation without diving headfirst into chaos? You plan first. This planning and design phase typically lasts 1–2 weeks. During this time, you’ll visualize your space using sketches or 3D renderings to map out the layout. You’ll also set a realistic budget and select your materials: tile, vanity, and fixtures. Getting quotes from contractors helps you align costs with your timeline. Finalizing your design plan locks in decisions and prevents delays later. Don’t skip permits either. This foundation phase matters because it feeds directly into execution. When work starts, you’ll already have materials ordered, plans approved, and approvals in place. You’re setting yourself up for success.
Demolition and Prep Work (2–4 Days)

Demolition and Prep Work (2–4 Days)
Your planning phase is done. Now comes the messy part. Demolition typically takes two to four days, where you’ll remove old fixtures, tiles, and everything that needs replacing. Your team carefully handles plumbing and electrical elements, often requiring temporary shutoffs for safety.
Good prep work prevents delays during this timeline. You’ll coordinate trades, schedule material deliveries, and plan waste disposal before swinging any hammers. This preparation keeps everything moving smoothly.
Coordination matters most during this phase. A well-organized team can stage demolition alongside rough-in prep tasks simultaneously, saving you precious time. In older homes, demolition takes longer because workers must preserve original details and address unexpected issues they uncover.
Think of this phase as clearing the canvas. Your bathroom renovation truly begins here.
Rough-In Work: Plumbing and Electrical (3–5 Days)

What happens after demolition? That’s when rough-in work begins. I’m talking about plumbing and electrical work that typically takes three to five days. During this phase, we reroute or install new supply and drain lines according to your design plans. Electrical rough-in involves routing wires, installing boxes, and preparing spaces for outlets, switches, and fixtures. Think of it as building the hidden skeleton of your bathroom. This work happens before final installation, so crews can access walls easily. However, timelines can extend if revisions pop up or unexpected issues emerge during rough-in. Discovering hidden problems behind walls might add days to your project. Understanding this stage helps you prepare mentally for potential delays ahead.
Installation and Fixtures (1–2 Weeks)

Installation and Fixtures (1–2 Weeks)
Once rough-in work is complete, you’ll move into the phase where your bathroom starts coming together. Installation and finishing touches typically span one to two weeks, a timeline that works well for most projects.
Your plumbing and electrical systems are ready. Next comes fixture installation: toilets, sinks, and faucets, which usually takes one to two days. We’ll check for leaks before moving forward. New flooring installation takes another one to two days on a clean, level subfloor. Wall tiling for showers happens during this phase as well. If you’re adding paint with moisture-resistant qualities, that requires about one additional day. These finishing touches convert your bathroom from rough framework into a functional, finished space that serves your daily needs.
Final Touches and Inspections (2–4 Days)

Final Touches and Inspections (2–4 Days)
How close are we to completion? You’re in the home stretch now. Final touches and inspections typically wrap up in 2 to 4 days after installations are finished. This phase includes final painting touch-ups, fixture adjustments, and trim work that makes everything look polished. We also address minor cosmetic corrections you might’ve noticed during installation.
Paint and sealants need drying times, which we factor into this window. You’ll participate in a thorough final walkthrough with your contractor to confirm everything works properly. We’ll review your punch-list together; that’s our checklist of remaining items needing attention. Scheduling inspections ensures all work meets local codes and your expectations. Once we’ve addressed every punch-list item, your bathroom renovation is complete and ready to enjoy.
Does Bathroom Size Change Remodel Timelines?

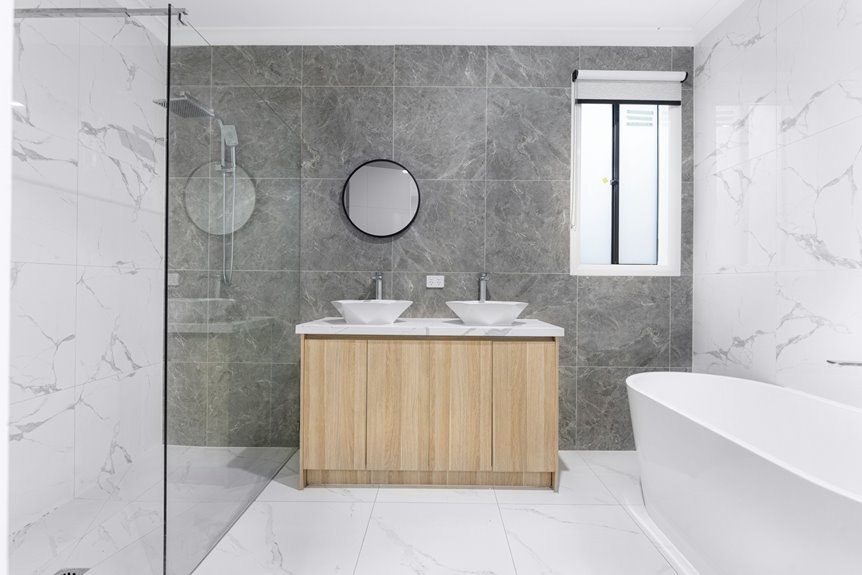
Your bathroom’s size really matters. A tiny bathroom might wrap up in just 1–2 weeks with a professional team, but a larger space or one needing layout changes could stretch to 6–10 weeks or more. Simple updates finish faster, while bigger rooms with custom features demand extra time and planning.
Small Bathroom Efficiency
When you’re planning a small bathroom remodel, does the compact space actually speed things up? Yes and no. Your small bathroom typically takes two to three weeks total. Demolition wraps up fast, just one to two days. But here’s the thing: tight spaces mean less room for error. Planning matters hugely. You’ll want your design finalized before starting because changes cost time and money. Tile lead times and fixture delays hit small projects just as hard as large ones. The rough-in phase (installing pipes and electrical) demands precision in confined areas. Finishing touches take patience too. Moving plumbing or reconfiguring layout pushes you toward that three-week mark. Simple cosmetic updates finish quicker, around two weeks. The real efficiency comes from smart planning upfront, which saves serious headaches later.
Large Space Complexity
Does a bigger bathroom really take longer to renovate? Absolutely. When you’re working with a large bathroom, your bathroom remodel timeline stretches significantly. You’re looking at five to nine weeks or more for project duration, depending on complexity.
Here’s why: larger spaces demand trades coordination. You’ll need plumbers, electricians, and tile specialists working together across a bigger footprint. That coordination takes time. Material lead times also increase because you’re ordering more fixtures and finishes. Permit complexity grows too; inspectors have more to review in spacious layouts.
Don’t forget the finishing phase. Heavy tile work and custom cabinetry require careful installation. Custom features push timelines even further. More space means more potential for surprises during demolition, which can delay everything downstream. Understanding this helps you plan realistically.
Scope-Based Timeline Variations
How much work you’re actually doing affects how long your bathroom remodel takes. A cosmetic update with new paint and fixtures wraps up in roughly two weeks or less. A full gut renovation takes significantly longer.
Here’s your phase-by-phase timeline: Planning runs one to three weeks, Demolition takes two to five days, and Rough-In requires four to eight days. Installation stretches two to three weeks, while Finishing claims one to two weeks.
Each phase length scales with your scope. Smaller projects move faster through every stage. Larger, intricate renovations push each phase further out. Understanding your specific scope helps you predict realistic timelines and stay on track with your project.
The 4 Biggest Bottlenecks in Bathroom Remodels

Why do some bathroom renovations finish in two weeks while others drag on for two months? The answer lies in understanding what typically derails projects. I’ve found that permits and inspections, backordered materials, plumbing issues, and electrical issues create the most common delays. Scheduling gaps between trades compound these problems further. Change orders and scope creep can add weeks unexpectedly.
| Bottleneck | Impact |
|---|---|
| Permits and inspections | 1–3+ days per approval |
| Backordered materials | Weeks of waiting |
| Plumbing/electrical issues | Days to weeks for rework |
| Scheduling gaps | Multiple stalls |
| Change orders | Unpredictable extensions |
Locking decisions early prevents scope shifts. Ordering materials immediately matters tremendously. Tight trade coordination minimizes gaps. You’ll finish faster when you anticipate these obstacles beforehand.
Permits and Inspections: Where Projects Stall

Permits and inspections consistently rank at the top of project delays for solid reasons. You’ll need city approvals before breaking ground, and processing times vary considerably depending on your city’s current backlog. Some permits arrive in days; others take weeks. That’s only the first step.
Inspections occur at key milestones throughout your project. An inspector visits your site, spends roughly an hour checking the work, then you wait days or weeks for the next available scheduling slot. Moving plumbing or electrical lines requires additional approvals, sometimes from the Department of Buildings or a licensed architect.
The fact is straightforward: you can’t start work until permits arrive. Experienced contractors navigate this process effectively, but timing partly depends on city schedules, which remains beyond anyone’s control. Plan your timeline with this reality in mind.
Material Backlogs and Custom Orders: Planning Ahead

Custom orders and imported materials can seriously delay your project timeline. You’ll want to finalize all your selections, from vanities to tile, and place orders before demolition even begins, especially if you’re choosing items that aren’t sitting on store shelves. I recommend keeping a contingency buffer of at least 15% built into your schedule so backorders won’t completely derail your plans.
Stock Options vs. Custom Selections
When you’re planning a bathroom renovation, one of your biggest timeline decisions comes down to this: do you choose materials that are already in stock, or do you order custom pieces?
Stock options move fast. You’ll find ready-made fixtures, standard tile, and basic vanities sitting on shelves right now. Custom selections take weeks. A made-to-order vanity or special tile can delay everything considerably.
Here’s the practical approach: lock in your material selections before demolition starts. This prevents mid-project changes that throw off your entire crew’s schedule. Order fixtures and tile early to avoid backorders that halt progress completely.
Keep backup options available as well. If your preferred custom piece faces delays, you’ll have alternatives ready to go. Stock materials aren’t boring; they’re practical timeline-savers that keep your project moving forward smoothly.
Lead Time Procurement Strategy
How’s your material delivery timeline looking? This is where many renovations hit unexpected delays. You’ll want to order fixtures, tiles, and finishes well before demolition starts. Custom or imported items can add weeks to your project, so check those lead times immediately.
My strategy involves finalizing your design choices early and placing orders right away. This prevents backorders from halting your entire schedule. I coordinate material deliveries with my contractor’s schedule, ensuring everything arrives when trades actually need it.
A practical move is having backup material options ready. If your primary selections face delays, you can pivot without pausing work. Your procurement planning directly impacts your scheduling success, so don’t skip this step.
Backup Materials and Contingencies
What happens when your primary tile choice disappears from inventory halfway through your project? That’s why I recommend building backups and contingencies into your plan.
Here’s how I stay prepared:
- Order all materials upfront before demolition begins
- Keep in-stock materials as your first choice whenever possible
- Research material lead times for custom items like vanities and imported tile
- Build a 15% buffer into contractor estimates for supply chain issues
- Identify backup options for critical fixtures before ordering
Long material lead times can derail your timeline fast. Custom orders especially create delays that halt progress when other trades stand ready. By ordering upfront and selecting in-stock alternatives, you’ll minimize mid-project surprises. I’ve learned that contingency planning isn’t pessimistic; it’s smart scheduling that keeps renovations moving forward smoothly.
5 Strategies to Keep Your Remodel on Schedule

You’ve got a timeline. Now let’s protect it.
First, hire a service contractor who coordinates all trades. They’ll handle timely communication and keep everyone moving together, preventing costly delays from miscommunication.
A coordinated service contractor keeps all trades aligned, eliminating miscommunication delays and keeping your project moving forward efficiently.
Second, nail down design decisions upfront. Finalize every selection: colors, fixtures, materials. Complete this before demolition starts. Mid-project changes create backorders and stall your progress.
Third, order in-stock materials early. Avoid waiting weeks for items. Stock availability keeps your project on track without unnecessary pauses.
Fourth, build a realistic buffer timeline with at least 15% extra time. This cushion absorbs surprises like permit delays or unexpected issues.
Fifth, maintain daily check-ins with your contractor. Quick yes-or-no decisions on details prevent stalls. Permits and approvals move faster when communication stays sharp.
These strategies work together, keeping your renovation moving smoothly forward.
Renovating an Older Bathroom: Extended Timelines Explained

Even with the five strategies I’ve shared, older bathrooms present their own unique challenges. When you’re renovating an older bathroom, you’re likely facing extended timelines. Here’s what typically causes delays:
- Hidden surprises behind walls. Outdated wiring and corroded pipes create unexpected problems during demolition.
- Structural or safety issues. These emerge once workers open walls, requiring specialized inspections.
- Water damage discoveries. Hidden moisture damage demands immediate attention and rework.
- Electrical and plumbing updates. Older systems often need complete replacement to meet current codes.
- Preservation requirements. Original architectural details require careful navigation and specialized labor.
I recommend building contingencies into your timeline and budget. Plan for extra time, typically two to four additional weeks. This buffer accounts for inspections, material sourcing, and unexpected fixes. You’ll feel more confident knowing you’re prepared for what lies behind those walls.