

1. Survey Your Yard Measure space, check drainage with a water test, and map sunlight patterns.
2. Review Local Codes Contact your building department about permits and setback requirements.
3. Choose a Design Pick a playset matching your budget and yard size.
4. Source Materials Gather lumber, hardware, and safety surfacing before starting.
5. Build the Frame Create a level, braced foundation using pressure-treated wood.
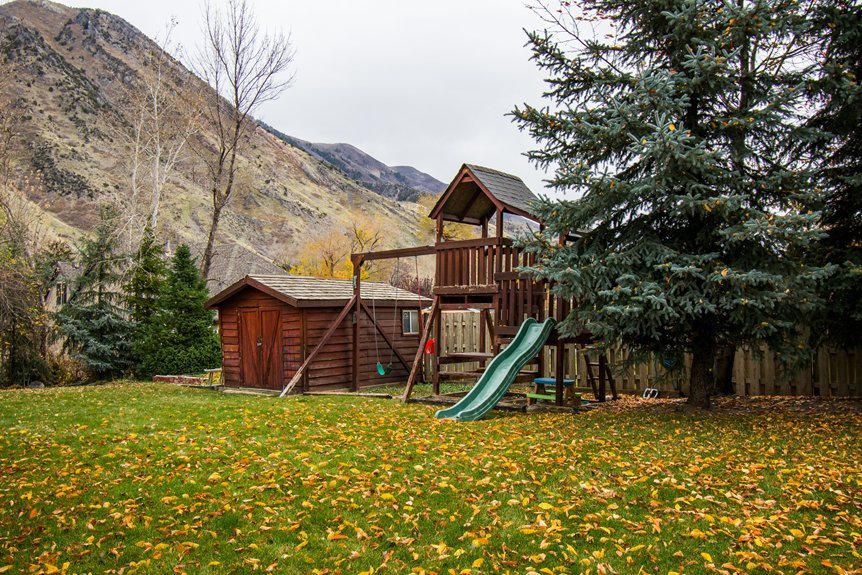
6. Install Safety Surfacing Lay rubber mulch six feet beyond the playset.
7. Secure Hardware Bolt everything down and inspect anchor points.
8. Attach Play Features Install swings and slides following manufacturer guidelines.
9. Test Everything Apply pressure to each component and check for movement.
10. Schedule Maintenance Inspect monthly and retighten bolts quarterly to keep your structure safe and sound for years ahead.
Survey Your Yard for Space and Soil Quality

Survey Your Yard for Space and Soil Quality
Before installing a playset, thoroughly evaluate your yard. Measure your available space in feet and inches, noting obstacles like trees, fences, and buried utilities that limit placement options.
1. Test Your Soil Drainage
Dig a 6-inch hole and fill it with water. If the water drains within 12 to 24 hours, your ground is firm enough for anchoring. This simple test prevents installation problems and saves money later.
2. Evaluate Soil Composition
Assess your soil type carefully. Clay soils need deeper footings or professional help, while sandy soils drain quickly but require additional support. Understanding what lies beneath matters for long-term stability.
3. Map Sun Exposure
Observe shade patterns throughout the day. This prevents glare on play surfaces and stops excessive heat buildup, keeping your family comfortable and safe.

VERSATILE DESIGN FOR ANY SPACE: This outdoor swing set boasts a simple, functional design that fits perfectly in various settings—whether it's your backyard, a school, or a playground. It’s a perfect outdoor space for kids to have fun and play to their heart’s content.
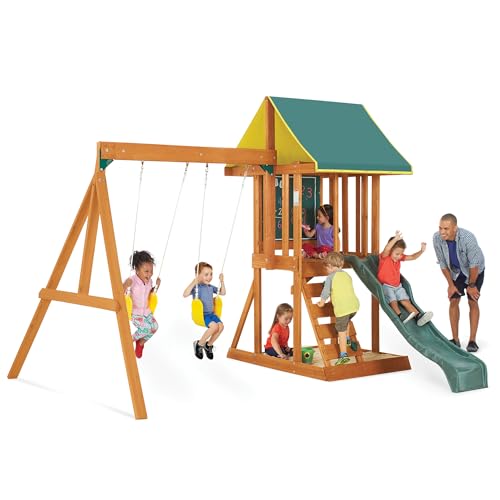
BUILT FOR OUTDOORS: Made to withstand the weather, this wooden backyard set is pre-treated with a water-based stain that includes UV and mold protection to hold up against the elements.

Multi-Level Wooden Swing Set: This swing set features a tall wooden tower with a balcony, bridge, tic-tac-toe game, and lower clubhouse, offering multiple levels for climbing, exploring, and imaginative backyard play
Review Local Building Codes and Safety Regulations

Before you break ground, check your local building codes and zoning rules to confirm your playset meets all requirements. Different cities have different rules about setback distances from property lines, maximum height allowances, and required safety surfacing materials underneath structures. Getting this right from the start prevents costly mistakes and potential legal issues while protecting your family’s safety.

HEAVY-DUTY WOOD CONSTRUCTION – Denser and more durable than typical swing set wood

Includes an alpine wave slide, sandbox, tic-tac-toe panel, steering wheel and a play telescope provide children with plenty of play options
Safety Standards and Requirements
Why should you check local building codes before you start construction? These rules protect your family and neighbors. I’ll help you understand what you need.
1. National Safety Standards
I recommend checking consumer product safety guidelines. They cover swing attachments, ladder rungs, and guardrails. These standards prevent equipment failure.
2. Local Permit Requirements
Some areas require permits for structures above certain heights. I suggest calling your local building department. They’ll tell you what paperwork you need.
3. Material Standards
I verify that materials resist fire and corrosion. Quality materials last longer and reduce costs over time. This protects your investment while saving money.
4. Ongoing Compliance
I follow manufacturer instructions carefully. Regular inspections catch loose components and rust early. Addressing hazards promptly keeps everyone safe.
Permit and Zoning Compliance
Permit and Zoning Compliance
Now that you’ve got your safety standards figured out, it’s time to check with your local government.
1. Contact Your Municipality
Call your local building department and ask if your playset needs a permit. Requirements vary by location and playset size.
2. Know the Thresholds
Height, setbacks from property lines, and foundation type determine permit needs. Some areas only require permits for structures above certain heights.
3. Understand Zoning Rules
Your playset must meet setback requirements from sidewalks, streets, and neighbors’ properties. Certain features (such as roofs or permanent foundations) may be restricted.
4. Plan for Inspections
Even permit-free projects often need final inspections. Keep documentation of plans, materials, and contractor details organized for compliance verification.
Select a Playset Design That Fits Your Budget

Several playset plans exist at different price points, so you’ll find options that work for your wallet. Review plans organized by size and cost to match your needs. You can start small and expand later if you’d like.
| Plan Name | Starting Price | Size Options |
|---|---|---|
| Petite Retreat Clubhouse | $45 | Up to 4 sizes |
| Sky Sentry Swingset | $75 | Multiple sizes |
| Toddler Playground | Varies | 2 sizes |
| Twin Peaks Swingset | Varies | 2 sizes |

CREATE A SAFER PLAY AREA - Playsafer rubber mulch is IPEMA Certified and helps reduce the risk of injury on playgrounds and play areas

When kids play, they also fall, and that's where PlayFall comes to the rescue. The 1.75 inch thickness is suitable for a 4 ft fall height.

Fall Height Protection: Loose fill rubber surfacing is rated for almost twice the fall height when compared to other loose fill materials
Choosing Your Size
Two-size options work well for smaller yards. Three-size and four-size plans give you more features and activities. Consider your available space carefully before deciding. Safety and durability remain consistent across all price tiers. Select what fits your family’s budget and space needs.

Ground anchor kit designed to work with private home swing sets, trampolines, or patio furniture
![[Premium] 4 Pack Ground Anchors with Power Nut Driver Drill Bit, Ground Anchors Screw in, Swing Set Anchors, Trampoline Anchors High Wind Heavy Duty for Camping Tents, Car Ports, Swing Sets, Canopies](https://m.media-amazon.com/images/I/51hA3rx7F9L._SL500_.jpg)
[Upgrade Version With Thick Spiral Blade Design] Compared to traditional manual anchors, these ground anchors are improved the full spiral blade design and their thickness to 2.16mm, creating spaces between the spirals to the rock layer that can creep into and keep anchors more firmly. Effectively prevent the tent from being blown away by the wind. Perfect for a variety of life scenes, outdoor activities, and other outdoor furniture.

Full Spiral Blade Anchors: Upgrade Version full spiral blade design make easier to drill into the ground, 2.21mm/0.087in Thick blade, 40mm/1.6in Wide blade and Overall length 38cm/15in, top ring design provides greater resistance, holds Firmly in place even on high wind
Source Materials and Hardware Before You Start

Before you pick up a saw or drill, here’s what you need to do: gather every single item your playset plan requires.
1. Match Your Plan Size
Confirm whether you’re building a 2-Size, 3-Size, or 4-Size variant. This determines how much lumber, screws, and brackets you’ll need. Getting this right saves money and prevents frustrating supply runs.
2. Collect All Materials
Round up lumber, screws, nails, framing brackets, deck boards, and your complete hardware kit. Nothing’s worse than stopping mid-project for missing pieces.
3. Prioritize Safety Components
Check that ground stakes, fasteners, and weather-resistant sealants are included. These protect your family and extend your playset’s lifespan, reducing future costs.
4. Review Load Ratings
Understand your plan’s weight limits and safety clearances. This ensures proper installation and compliance with local guidelines.

Kit only includes hardware and swings to help you build a custom swing set (wood and wood screws not included)
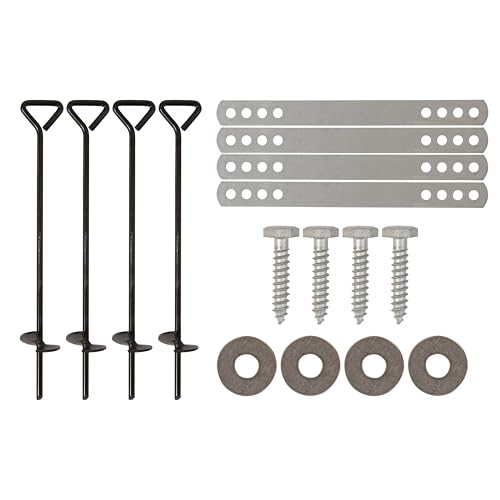
ANCHOR SWINGSETS — Secure your playset to the ground more strongly than pegs

Build Your Base Frame and Support Structure

Now that you’ve gathered your materials, I’ll walk you through building the foundation that’ll keep your playset safe and stable for years. You’ll start by choosing the right foundation materials, installing proper structural support, and assembling your frame using techniques that ensure everything’s level and square. Let’s break down each of these steps so your playset stands strong.

Elevated Adventure: Spacious raised clubhouse with a balcony, wide windows, and a wooden roof is perfect for outdoor play, complemented by a wide step ladder for easy access

3-IN-1 SWING SET FOR ENDLESS BACKYARD FUN: This versatile swing set includes a baby swing, tree swing, and classic belt swing, giving children of different ages their own way to play and grow. Whether your little one is just learning to swing or ready for bigger adventures, the flexible design supports DIY combinations so you can easily create a customized backyard playground that evolves with your family.

Hours of Outdoor Fun: The outdoor swing set is designed with a weight capacity of 150 pounds for the swing and slide, ensuring it can withstand multiple children playing on it. This allows children and their friends to have fun playing together. Swing playsets for the backyard inspire parents to bond with their children, fostering precious family moments.
Foundation Materials Selection
Foundation Materials Selection
What makes a backyard playset stand strong for years? The foundation.
1. Choose Pressure-Treated Materials
Pressure-treated lumber or plywood work well for your base frame. These materials resist moisture and decay, saving money long-term and reducing waste from replacements.
2. Install Concrete Footings
Concrete footings or deck blocks should go beneath each support post. They transfer weight into the ground and prevent shifting during play.
3. Keep It Level
Measure diagonally across corners to check levelness. Adjusting footer height before anchoring posts prevents wobbling later.
4. Use Corrosion-Resistant Fasteners
Select galvanized or stainless steel fasteners and weatherproof brackets. These withstand outdoor conditions without rusting.
5. Plan for Drainage
Elevate the frame slightly or add gravel underneath. This prevents water pooling and protects your investment from rot.
Structural Support Installation
Structural Support Installation
Once your foundation’s set and level, you’re ready to build the frame that’ll hold everything together. This guide walks you through creating a sturdy structure that keeps your playset safe and stable for years.
1. Choose Your Posts
Use treated lumber or steel posts. Treated wood resists rot and saves money long-term. Steel offers durability but costs more upfront.
2. Secure the Frame
Install deck anchors or auger anchors into the ground. These prevent wind damage and resist movement from jumping and swinging forces.
3. Add Cross-Bracing
Install diagonal supports to stop racking, which is when the frame twists. This keeps everything square and rigid.
4. Inspect Everything
Check alignment and plumbness of vertical supports. Tighten all bolts before adding decking and rails.
Frame Assembly Techniques
How do you turn scattered lumber into a rock-solid foundation? You’ll start by building your base frame using heavy-duty 2×6 or 4×4 framing lumber. I make sure my corners are perfectly square and my footprint stays level. This foundation supports everything that comes next.
- Use galvanized or weather-resistant hardware to prevent rust and rot
- Reinforce your platform with joists spaced every 12 to 16 inches
- Add cross-bracing and diagonal supports for increased rigidity
- Test load paths by simulating weight on each section
I verify my structure handles full weight on swings, slides, and climbing elements. Quality assembly means your playset lasts years while keeping maintenance costs down and protecting your investment.
Install Platforms, Railings, and Climbing Features

Install Platforms, Railings, and Climbing Features
Because safety and stability depend on solid construction, I’ll walk you through installing the key structural components that make your playset both fun and secure.
1. Platform Installation
I space joists 12 to 16 inches apart to create a sturdy, flex-resistant base. This spacing supports deck boards evenly and handles active play without bouncing.
2. Railing Safety
I attach railings 42 to 48 inches high around elevated edges. Balusters spaced no more than 4 inches apart prevent children from getting stuck.
3. Material Selection
I choose treated lumber or composite decking for weather resistance. These durable materials last longer and reduce replacement costs over time.
4. Climbing Features
I secure ladders and rock walls with heavy-duty lag screws and reinforced supports to eliminate wobble.
5. Hardware Inspection
I tighten all connections with proper fasteners and regularly check for loosening during use.
Lay Down Safety Surfacing and Ground Anchors

Lay Down Safety Surfacing and Ground Anchors
With your platforms, railings, and climbing features now in place, the next step protects children from fall injuries.
1. Select Your Surfacing Material
Rubber mulch, shredded rubber, or poured-in-place rubber are effective choices. These materials absorb impact well and outlast wood chips, reducing replacement costs over time.
2. Install Proper Depth and Coverage
- Apply surfacing to the manufacturer’s recommended depth for your playset height
- Extend coverage at least 6 feet beyond the playset’s footprint in all directions
- Check local codes for specific thickness requirements
- Inspect ground levelness before installation to prevent wobbling
3. Secure Ground Anchors
Compact the ground thoroughly before anchoring. Use appropriate footing systems specified for your playset plan. Proper anchoring resists wind and heavy use, maintaining long-term stability and safety for your family’s outdoor space.

Fast Patch Rubber Playground Repair Kits are designed so anybody with a limited knowledge of tools can easily repair cracks, splits and holes in poured-in-place playground surfacing.
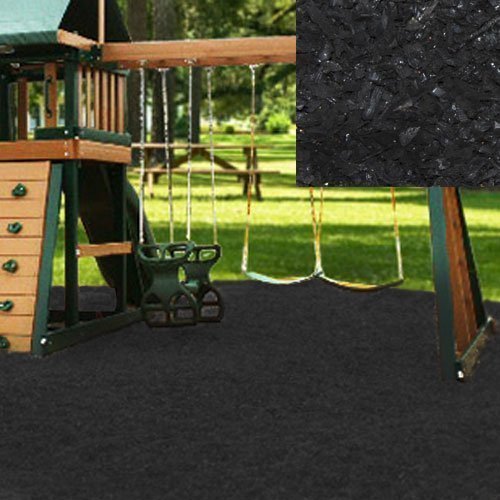
Loose fill rubber surfacing is rated for almost twice the fall height when compared to other loose fill materials.

Shredded rubber mulch looks like real wood mulch
Bolt Down Hardware and Test All Anchor Points

Bolt Down Hardware and Test All Anchor Points
I select stainless steel or galvanized bolts rated for outdoor use. They resist rust and last years longer, which saves money over time.
| Inspection Point | Timeline | Action |
|---|---|---|
| All anchor bolts | 24 to 48 hours | Check for movement |
| Connection points | 1 week | Re-tighten if needed |
| Hardware condition | Monthly | Look for corrosion |
Test Before Use
I create a safety checklist testing each anchor for wobble and strength before kids play. This step catches any problems early and prevents accidents.

Thick Spiral Blade Design: Upgraded with 2.16 mm thick spiral blades, these ground anchors feature a full helix structure that penetrates soil, clay, and even rocky layers with ease. The spaced spiral design allows the rock layer to grip the anchor securely, improving holding power and minimizing slippage. Ideal for preventing your tent, trampoline, or furniture from being displaced by wind, they’re a reliable choice for outdoor furniture, life scenes, and recreational setups.

HEAVY DUTY TRAMPOLINE ANCHORS – Designed for ultra-strong hold in high wind conditions, these ground anchors securely fasten trampolines, outdoor sheds, and large equipment firmly to the ground, eliminating shaking and displacement.
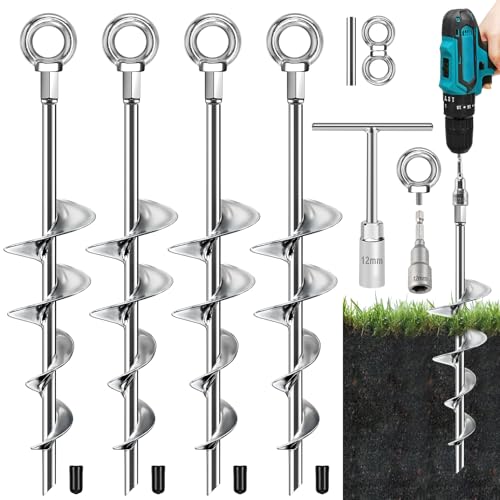
Upgraded Spiral Blade Design: Ground anchors feature an innovative spiral blade with a wider top for better surface grip and a narrower bottom for deeper soil penetration, offering dual support to prevent loosening and reduce installation resistance
Attach Swings, Slides, and Accessories

Now that your frame is secure, you’ll attach the swings, slides, and accessories that make your playset functional and fun. I’ll walk you through choosing compatible components and installing them correctly so they stay safe and stable during play.
Start with the basics of swing installation. Swings require proper attachment points on your frame’s top beam. Check your manufacturer’s specifications for weight limits and recommended spacing between swing hangers, typically 24 to 36 inches apart. Use the hardware provided, ensuring all bolts are tightened securely with a wrench.
For slides, position them on a lower section of your frame where children can climb to reach the slide entrance safely. Slides need solid support at both the top and bottom; secure the top bracket first, then attach the slide bed, and finally install the exit ramp. Make sure the slide angles between 30 and 40 degrees for proper descent speed.
Accessories like monkey bars, climbing nets, and sandbox attachments work best when installed on lateral frame sections where they won’t interfere with swing motion. Check weight ratings for each accessory, and verify all connection points match your frame’s design.
Before allowing children on the playset, test every component by applying downward pressure and checking for movement or loose fasteners. Inspect all bolts monthly since vibration from use can loosen them over time.
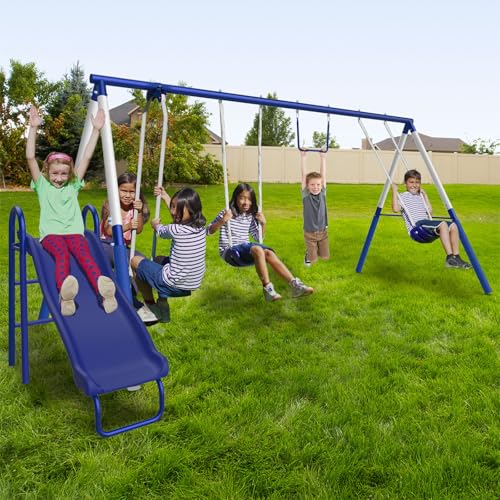
OUTDOOR FUN: The Sportspower Arcadia Metal Swing set is feature packed with 6 play stations: 2 non-slip adjustable swing seats, 1 trapeze bar, 1 two-person glider, foam leg covers and 1 five-foot wavy slide. Up to 6 children to play at once!

Our Classic A-Frame Swing Set Kit comes complete with everything that you need to construct a free standing swing set with 3 swings

Perfect for wooden playsets, playhouses and outdoor furniture
Swing Installation Basics
How do you turn a basic frame into a fully functional play structure? I’ll walk you through swing installation, the foundation of any great playset.
Key Installation Steps:
- Secure swings using orbital or locking carabiners and galvanized bolts to reinforced beams
- Position hanger bolts perpendicular to the frame for even weight distribution
- Tighten all connections to manufacturer-specified torque settings
- Inspect pivot points and anchors regularly for wear
Level mounting is recommended to maintain stability. Galvanized hardware resists rust, which extends your playset’s lifespan and protects your investment. Proper installation prevents accidents and keeps maintenance costs down.
Once swings are secure, you’re ready to add slides and accessories. Each component builds on the solid foundations you’ve established here.
Accessory Compatibility Guide
Why does picking the right accessories matter so much? Getting it right saves you money and keeps everyone safe.
1. Check Your Plan Size
Different playsets come in 2-, 3-, or 4-size options. Your plan size determines which accessories work best. Always verify your specific size first.
2. Review the Approved List
Check your plan’s approved accessory list. This list shows what swings, slides, and add-ons fit your playset. Skipping this step creates problems later.
3. Match Your Hardware
Mounting hardware must match your plan and accessories. Mismatched hardware fails. Use only what the manufacturer recommends.
4. Respect Weight Limits
Each accessory has weight restrictions. Following these prevents damage and injuries. Weight limits are a safety requirement, not optional guidance.
5. Follow Installation Guidelines
Read manufacturer instructions carefully. Proper installation ensures durability and safety. You’re protecting your investment and your family.
Walk Through Your Final Safety Checklist and Establish Maintenance Routines

Walk Through Your Final Safety Checklist and Establish Maintenance Routines
You’ve built something substantial for your kids. Now let’s ensure it stays safe and performs well for years to come. I’ll walk you through the essential checks and routines that protect your investment and your children.
1. Complete Your Safety Inspection
Inspect all bolts, brackets, and anchors for tightness and corrosion. Check swing chains and ropes for cracks. Verify that ground clearance meets manufacturer guidelines.
Inspect bolts, brackets, and anchors for tightness and corrosion. Check chains and ropes for cracks. Verify ground clearance meets guidelines.
2. Establish Your Maintenance Schedule
- Monthly: inspect for wear and damage
- Quarterly: lubricate all moving parts
- Annually: re-tighten hardware and safety rails
- Document everything in a maintenance log
3. Create Your Safety Records
Maintain detailed records noting dates, findings, and repairs. This documentation helps you stay compliant with safety standards and protects your family over time. Good record-keeping also saves money on replacements while extending your playset’s useful life.